Super Consigning 101: How to Consign
Consignors earn 70%!Selling your children’s outgrown items are a great way to earn extra money for your family! Not only does it help to clean out the playroom and closets but it helps to recycle and allow others to buy items at GREAT prices.


Consigning Basics
- Anyone is welcome to sell.
- Sellers earn 70% of items that sell.
- A $10 non-refundable consignor fee is deducted from your consignor check.
- Sellers receive two passes to shop the Seller’s Sell.
- Tag & place your items out for sell.
- Pickup or donate unsold items at the end of the sale.
- Checks are mailed within two weeks after the end of the sale.
Simple Selling Steps
- Register as a Consignor for the upcoming sale.
- Print tags
- Tag your items
- Place items on sales floor during drop-off hours.
- Pick up unsold items or donate.
- Receive your check within two weeks after the sale ends.
- Cash your check & enjoy your clean playroom and closets!
How to Become a Consignor
- From the home page of the website, click on New Consignor – found on the left hand side of the page.
- You will be moved to the My Sale Manager website.
- Follow the prompts to enter all required information.
- Once finished, you will be able to print tags.
What Can I Sell?
- All items should be in gently used or new condition.
- Do not sell items that are recalled, broken, missing buttons, or have holes/stains.
- Any item that has to do with kids from pregnancy through the teenage years can be sold.
- We accept all brands.
- We do not accept mattresses unless they are BRAND NEW with tags.
- We do not accept car seats that are over 6 years old. Manufacturing information must be present on the seat. Out-of-date car seats will be removed.
- We do not accept men’s ,women’s & juniors clothing. These items will be pulled from the racks.
- There are two sales per year.
- Spring is for spring and summer clothing. No heavy jackets, winter wear, snow boots, etc…
- Fall is for fall and winter clothing. No bathing suits, bathing suit cover ups, tank tops, etc…
- Crossover clothing is fine at both sales.
- Costumes are allowed at both sales.
- If clothing racks become full, clothing items that do not match that season of the sale will be REMOVED! If space becomes available as items sell, removed items will be placed back on the rack.
- Example of items (this is not a complete list): baby equipment, strollers, pack n plays, jumpers, swings, bassinets, bouncy seats, play mats, beds, cribs, maternity gear, equipment and clothing, feeding supplies, bottles, pacifiers, bids, burp clothes, baby blankets, swaddlers, baby travel gear, safety gear, baby and kids furniture, toys, games, puzzles, stuffed animals, arts & crafts, ride-on toys, doll houses, toy sets, dolls, action figures, nerf guns, sporting equipmnent, outdoor play equipment, bikes, scooters, beach and pool toys, books, homeschool books, purses, bags, book bags and lunch boxes, clothing, costumes, accessories, shoes, bath and potty items, kids tables and chairs, bedding, crib sets, kids room decor, pictures and lamps, rugs, etc…
- We do have a home decor section. This section is limited to home decorations including rugs, curtains, signs, pictures, small decor items, etc…
- Clothing sections and sizes:
- Girls: NB – 16+
- Boys: NB – 16+ including husky sizes
- Maternity – S,M,L,XL+
- Costumes: placed together on one rack (not sized)
- Shoes:
- Girls: NB (size 1) – Women’s size 10+
- Boys: NB (size 1) – Men’s size 10+
Tagging Supplies Needed
- Colored Card Stock Paper
- White Card Stock Paper
- Scissors
- Black ink pen
- Hole punch
- Zip ties (also called ‘cable ties’)
- Quart & gallon size plastic bags
- Packing tape
- Hangers – metal, plastic, adult or kid sized.
- Tagging gun may be used but not required
Preparing Items to Sell
- Clothing Items:
- Metal hangers are preferred but plastic hangers may be used. (Hangers go with the item when sold.)
- Most clothing should be on hangers
- Clothing must be secure on hanger using zip ties or safety pins
- Clothing sets sell better, so try to keep sets together and on one hanger. One hanger per set.
- Only place clothing together that is the same brand.
- The hanger opening should be facing the left if you are looking at it. It resembles the shape of a question mark.
- Hang shirts, vests, jackets, dresses, overalls, bathing suits, etc…on the hanger like usual. Secure clothing that may fall off with a safety pin to the hanger.
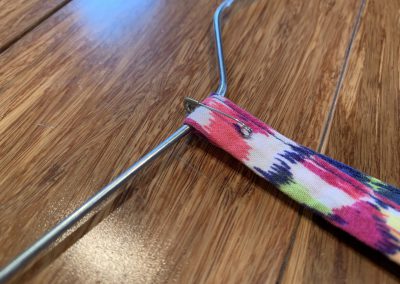
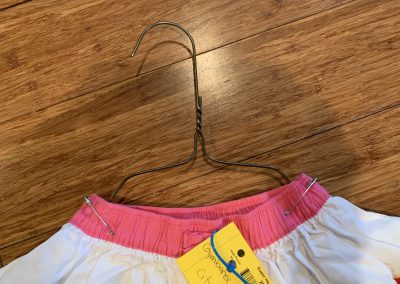
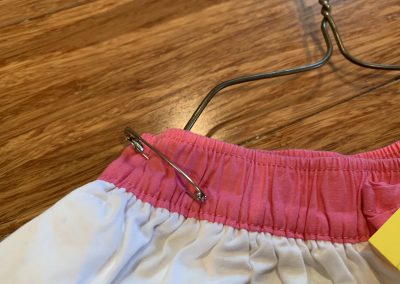
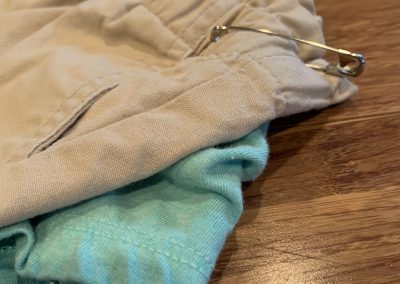
- Pants, shorts, bottoms, etc…lay the garment on the hanger and pinch garment over the top of the hanger. Run safety pin through garment and over hanger so it will be secure on the hanger. Do this to both the left and right side of garment.
- If clothing is small (i.e. NB onsie) and the hanger will not fit inside you can pin it to the front of the hanger.
- Clothing does not have to be ironed but should look presentable on hangers.
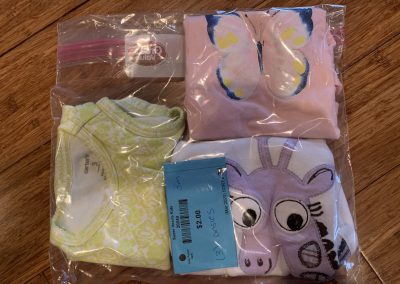
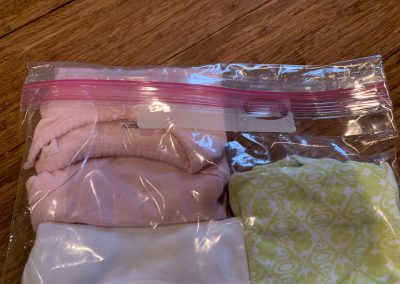
- Sets of clothing (i.e. same size onsies, shorts, bloomers, pants) can also be placed in zip lock bags, sealed and taped closed. This is only recommened for baby items.
- Clothing on hangers has the best chance of selling.
- Shoes:
- Clean rubber soles with magic eraser.
- Do not sell worn out shoes or dirty shoes.
- Attach shoes together with a zip tie or place them in a zip lock bag and tape closed.
- Shoes will be displayed on a gridwalls using paperclips. Super Hearts will provide the paper clips.
- Shoes must be attached together is some way and able to be hung with a paper clip.
- Linens – Size Medium & Large:
- Hang linens over a clothing hanger
- Medium & large linens will be display on a clothing rack
- Items that can be hung this way:
- comforters
- bedding sets
- sheet sets
- large kids blankets
- mermaid tail blankets
- sleeping bags
- etc…
- Small linens can still be folded, taped, zip tied, or placed in bags. These will be displayed around the larger hanging linens.
- Non-Clothing Items:
- All items should be clean.
- Make sure toys and items are working/functioning properly.
- Try to find pieces to toy sets. Toys sell better when the sets are complete or almost complete.
- Do not sell puzzles or games that do not have all the pieces.
- Press n Seal wrap works great to cover puzzles and keep pieces in place.
- Plastic wrap works well to secure toys together (i.e. blocks in a wagon)
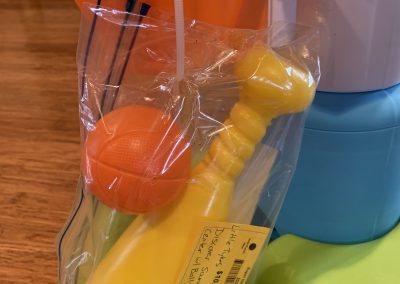
- Grouping toys together is fine. Be sure to place them in a zip lock bag, seal and tape closed.
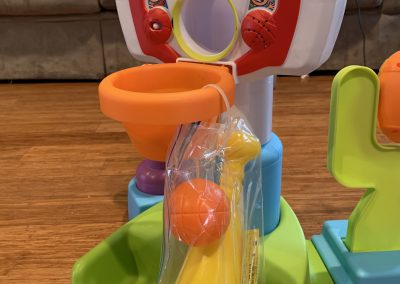
- Secure zip lock bags of toy pieces to large play sets with zip ties.
- Any small type items can be placed in zip lock bags. (i.e. headbands, socks, bottles, pacifiers, bibs, burp clothes, etc…)
- If bringing more than 10 books, please place them in a cardboard box with spines facing up and cut the flaps off. Boxes may be used for displaying books.
- Wearable baby carriers should be hung on clothing hangers. They will be displayed on a clothing rack.
How to Print Tags
- Make sure you have registered for the current upcoming sale.
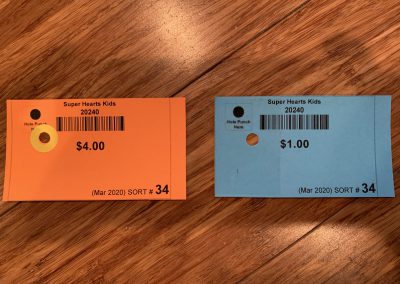
- Super Hearts tags must be used.
- Log in to your account by clicking “Login” in the menu. Use your consignor number and password that you created when signing up.
- Click the “Menu” button in the top left.
- Click “Barcodes Labels/Tags.
- Type in the dollar amount, the number of tags you want for that dollar amount and choose yes or no for “Allow Discount”
- Then click “Submit Barcode”.
- Continue to do this with each dollar amount that you would like.
- Amounts can only be in whole dollar amounts.
- Once you are finished with adding all dollar amounts, click “Submit Barcode Order”.
- A message will appear, in the middle of the message click “Display Barcode Labels For Printing”.
- This will bring up your tags and you can print them.
- Batches of printed tags will be kept in your Consignor Homepage under “Barcode Label/Tag Orders.
- You can order new tags each time or reprint from a previous batch.
- Cut out labels/tags.
- Leave some extra card stock instead of cutting right on the lines.
- You are now ready to tag your items.
Do not bold or change your barcodes in any way.
If you notice the barcodes are printing as a split barcode (regular on one side and small on the other), this is printer issue and needs to be adjusted. These barcodes will not scan.
Note about Cardstock:
Cardstock is a thicker paper that is required. It can be purchased at Walmart, Target or any office store.
Colored cardstock means you will return during pick-up to get items that did not sell.
White cardstock means that items will be donated if it does not sell. Gray, off-white, tan, cream, etc…will be considered white cardstock and items will be donated.
Neon or pastel color cardstock works the best!
Do not use red or dark blue or dark green. Do not use a shiny cardstock. The scanner will not read the barcode off of these.
How to Tag Items
IMPORTANT: You will need to decide while tagging your items if you want the item back if it doesn’t sell or if you want to donate it. White tags indicate donation items if not sold. Be sure to use the correct tags (colored or white) cardstock when tagging.
IMPORTANT: Sorting at the end of the sale is a very labor intensive job. DO NOT label your items with color tags and then NOT return to pick them up. It is a waste of our volunteers’ time to sort items because they were tagged with color tags and then decide to leave a portion or not return at all to pick up items. Please pick the appropriate tag when tagging items!
TAG INFORMATION:
- Your seller/consignor number is how our system keeps up with what items sell and how much to pay you. This number is the same for every sale that you register for.
- Your sort # is the number used to sort your unsold, non-donation items at the end of the sale. This number may change from sale to sale depending on when you register. Once you start selling with us, it is best to sign up early for each sale. This gives a higher likelihood of keeping the same sort #.
- Tags from previous Super Hearts sales can be used. Please double check that the sort # is correct. If not, you can print stickers from your account home page or you can cross out the old sort number and hand write the new one.
- IMPORTANT: DO NOT change the price on your tags by crossing it out and handwriting a new price. The barcode includes the orginial price of the tag and will ring up incorrectly. Print a new tag with the new price instead.
Clothing Items:
- Write in the size in the top right hand corner of tag.
- Numerical sizing is preferred (2T, 3T, 4T, etc… – not S,M,L)
- Write a short description of the item in the center of the tag under the price.
- This is important in case the tag falls off.
- Write the brand on the left side of the tag under the hole punch area.
- Hole punch the tag not too close to the corner.
- Suggestion: hole punch further in on the tag than indicated.
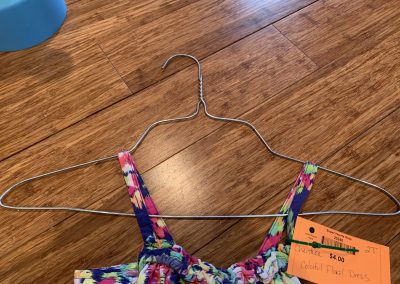
- Use hole reinforcements or packing tape to secure tag. Especially recommended for expensive items.
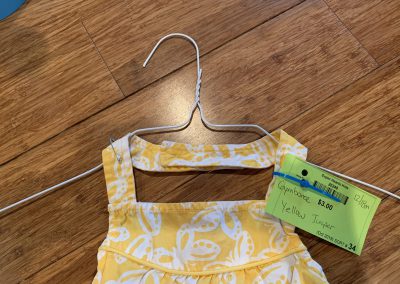
- Zip tie or pin tag to garment (not the hanger).
- Tag must be in the torso area/front area of the garment.
- Zip ties are recommended when they can be used.
- Can use safety pins if there is no where to zip tie the tag.
- Make sure zip tie is connected correctly. Test for security.
Non-Clothing Items:
- If size does not apply, leave top right corner blank.
- Write a short description of item in the middle of the tag under the price.
- If an item is missing a piece, state it on the tag.
- For added security, use packing tape to “laminate” tags – especially for toy items.
- This will give extra security and make it more difficult for the tagged to be pulled off.
- Tags should either be zip tied to items or can be taped using packing tape.
- DO NOT use scotch tape.
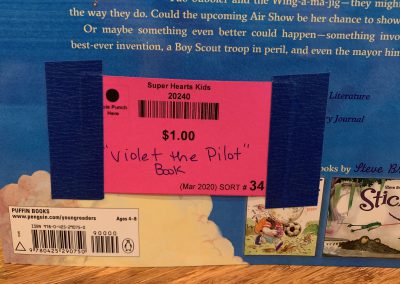
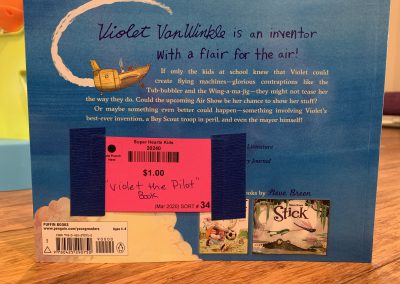
- For books and other items that may rip easily with packing tape, you can use blue painters tape to adhere tags. Place tape on each side of tag. Do not cover the barcode or sort number.
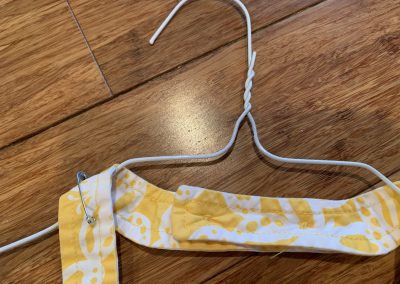
See picture gallery below for examples of tagging items.
Dropping Off Items
- Please see ‘Schedule & Location’ above in the menu for dates and times of drop-off.
- Sellers check-in at the entrance door by handing a staff member their ‘registration confirmation page’. You will have printed this page at home after registering on line for the upcoming sale.
- Please do not forget your ‘registration confirmation page’. If forgotten, this will significantly slow down your check-in time. After printing, place in your car for safekeeping. If you did not print this page or have lost it, click on “Find Forms Here” in the table listing above and click “Confirmation Registration” to print a new one.
- Sellers are responsible for placing their own items in the appropriate areas on the sales floor. Please plan enough time to place your items out and be able to exit the building by closing time. It will be very helpful to have a wagon or large stroller to bring your items into the building.
- At times, there may be volunteers to help place items on the sales floor.
- We can help unload large items.
- We provide rolling garment carts and flat bed carts for use. These carts are first come, first serve and during busy times, all of these may be in use.
- Pre-sort your items by size, gender and category for a faster drop off process.
- Sellers are NOT ALLOWED to tag any items while inside the building. For security of items, please tag at home or by your car, but NOT inside the building.
- Sellers can return as many times as needed during drop-off hours to bring items.
Picking Up Unsold Items
- Please see ‘Schedule & Location’ in the menu above for your Pick-up Time. Also found on the paper given to you during drop-off.
- VERY IMPORTANT – We strive to have all items sorted by 6:30pm Saturday evening but sometimes there are circumstances that cause sorting not to be finished by 6:30pm. If that is the case, you will be notified at the door when checking in for pick-up that sorting is not complete and will be explained the following two options.
- You can take what is already sorted and leave the rest for donation to the charity.
- You can wait until all items are sorted and then remove your items from the building.
- Super Hearts is not held responsible for items that are not picked up by the end of pickup time (8pm).
- All items and clothing will be sorted down to the individual sort number and placed in one area together and labeled with your sale specific sort number not by consignor number.
- Anyone picking up other than the Seller, must bring an Unsold Items Release Form filled out by the Seller. You can print this form from the link found under the “Find Important Forms Here” tab under Super Consigning 101.
- Please check the LOST TAGS area for your items, located at the front of the building near the check-out room. An item with no tag must be checked out with a staff member before leaving with the item.
- You must check out with a staff member before exiting with your items.
- Thank you for selling with Super Hearts Kids Consignment.
Pricing Guide: How to Price Your Items to Sell!
- Price to SELL!
- It is important not to overprice.
- Items will not sell if overpriced.
- Think about how much you would pay for that item in a consignment sale situation. If you won’t pay the price you put on that item, then no one else will either.
- For all items, consider the brand of the item.
- Name brand and boutique items may bring more.
- Also consider the condition of the item.
- Items that are brand new with tags will command a few more dollars than items not new.
- Remember that shoppers are savvy. They know how to shop on sale and clearance. They are not going to pay any where near full price for something that is used.
- One rule of thumb is to price 1/3 to 1/4 the retail price.
- The biggest mistake seen from consignors is overpricing. Example: pricing a Carter’s 3 piece outfit for $6-$10. Generally, it doesn’t sell at this price. The recommendation would be no more than $4-$5 at the most.
- If planning to donate items that don’t sell, consider this in your pricing also. If you are getting rid of it anyway, then price a little lower so that it sells.
- It is recommended to let most of your items go for 1/2 price on Half Price Day. You will sell more items this way and have more money in your pocket.
Find Important Forms Here
Important Forms:
CONFIRMATION Registration – Used to check-in for drop-off of items.
Unsold Items Release Form – Use when someone other than you will be picking up your unsold items.
Recall Information
Recall Information:
It is the consignors responsibility to ensure they are not bringing items to sell that have been recalled. If we find items on the sales floor that are recalled, they will be removed and donated if they are white tagged or will sort them into the sellers pickup pile of items if they are color tagged. Use these links below to check recalls on items.
Consumer Product Safety Commission Use this website to find recall information on all kinds of consumer products.
Child Seat/Car Seat Recalls Use this website to find recall information on child safety seats/car seats.
Adding Extra Security To Tags
Use hole reinforcements or packing tape on your tags. Also punch the hole further in instead of where the hole punch is indicated. These measures help to keep the tag from being ripped off easily.
How To Hang Tops
Always hang tops as you normally would on a hanger. The opening of the top of the hanger should always face to the left, like a question mark. Add a safety pin on strappy or overly loose items to secure them to the hanger. Attach tag with a zip tie or safety pin.
How to Hang Tops Continued
Example of a strappy top on a hanger. Strap is pinned to the hanger to keep the garment on the hanger.
How to Hang Bottoms
Always attach bottoms to the hanger as shown in the picture. This is the best and neatest way to hang bottoms and keeps them from sliding around on the hanger.
How to Hang Bottoms Continued
Close up of the safety pin through the garment and around the hanger. Do this to both sides of the garment.
How to Hang Bottoms Continued
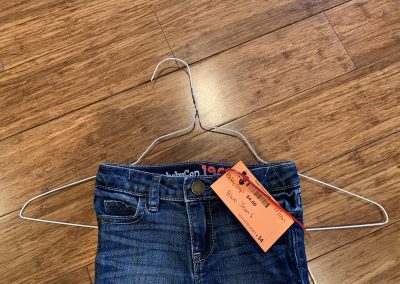
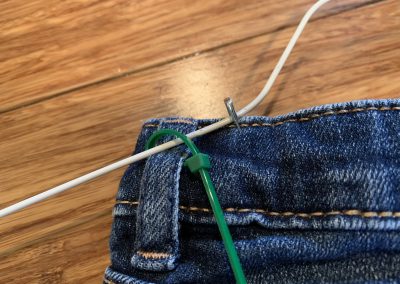
Another example of bottoms on a hanger. Notice tag is zipped tied to the belt loop here. Always attach tags using a zip tie when possible. Otherwise, use a safety pin.
How to Hang Bottoms Continued
Close up of safety pin on the back of the garment. Pin in through the garment and around the hanger. You can also use a zip tie when possible to add extra security and this helps if a safety pins becomes unlatched or breaks.
How to Hang Sets
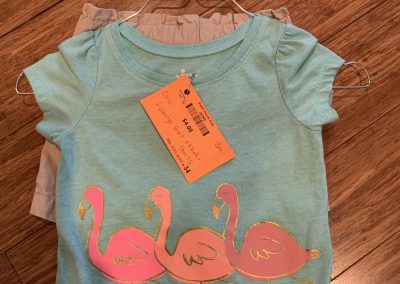
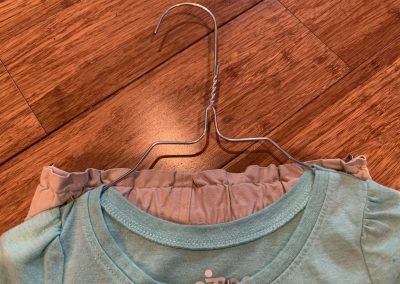
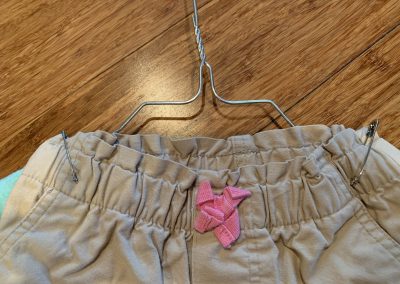
Hang the top on the hanger as usual and then follow instructions on how to hang bottoms. Bottoms are attached to the hanger with safety pins. This provides a neat representation of your items on the sales rack.
How to Hang Sets Continued
Close up of how the bottoms are attached to the hanger using safety pins. Ensure that the whole set stays together.
Using Zip Lock Bags
You can place small items in zip lock bags. For example: small toys, arts and crafts, things with lots of pieces, socks, hair bows, same size onsies, etc…I like to place my tag inside the bag before sealing but you can also tape it to the outside of the bag using packing tape.
Use Zip Lock Bag and Zip Tie for Toy Sets
When attaching smaller toy set items to the large item, place smaller items in a zip lock bag, zip closed, tape down, place a whole through the bag and zip tie the bag to the toy.
Use Zip Lock Bag and Zip Tie for Toy Sets
This helps to keep all the items in the set together. You can place the tag inside the bag before zipping and taping or attach the tag by itself to the larger toy with a zip tie or using packing tape.
Use Painter’s Tape On Books & Other Fragile Items
Painter’s tape is much nicer to materials that packing tape may rip easily. For example – books, puzzles, stickers on toys, etc. Use painters tape anytime you are concerned about the packing tape destroying any item.

